8 July 2013

Merly Impressions retreat layouts

 Here's an interactive layout designed by Chrissy for the Merly Impressions retreat I went to the other weekend it uses the Hopscotch Collection by Kaisercraft.
We created a little flip book in the centre of the layout!


Happy crafting!
GlitteryKatie XxX

4 July 2013

More Merly Retreat Layouts

Here are another two layouts from the Merly Impressions retreat using the beautiful vintage Miss Empire range by Kaisercraft
 I completed the first layout using a picture of My Great Grandma Ellen Taylor (nee Green) and because there were so many cool male themed elements in the Collectables I decided to do another layout using a photo of Ellen's Father, my Great-Great Grandad Edward Green!
Layouts designed by Chrissy!

My Great Grandma Ellen Taylor (1876-1971)


My Great-Great-Grandfather Edward Green (1954-1922)


Happy crafting!
GlitteryKatie XxX

3 July 2013

Bombshell July Challenge!

This month's challenge has been set by Ms. July Michelle Giraud very patriotically she has challened us to use red, white & blue as this month is American Independence Day and Bastille Day !

Supplies
Butterfly Queen Bombshell Stamp Set
Spectrum Noir Markers
Tim Holtz Old Glory Alterations Die
Silver Stickles
Distress Ink
Patterned Paper

So pop along to the Bombshell Blog to see the DT's takes on Michelle's cool theme!

Happy Crafting!
GlitteryKatie XxxxxxX

1 July 2013

Merly Impressions retreat layouts!

Here are another two layouts from the Merly Impressions retreat I went to last weekend!
I love this photo of my Mum taken in about 1962 when they lived in Cologne, Germany.
 Mum looks so elegant and kinda cheeky too- which is very her!
I love that she's wearing a cardigan- i love a cardigan myself!


This layout was designed by Chrissy and uses the very stylish Elegance Collection from Kaisercraft

Happy Crafting
GlitteryKatie XxxX

28 June 2013

Bookscrapping weekend!

Last weekend I had a fabulous time at the Merly Impressions 1st Retreat .
Here are some of the layouts I created from Chrissy's awesome kits:


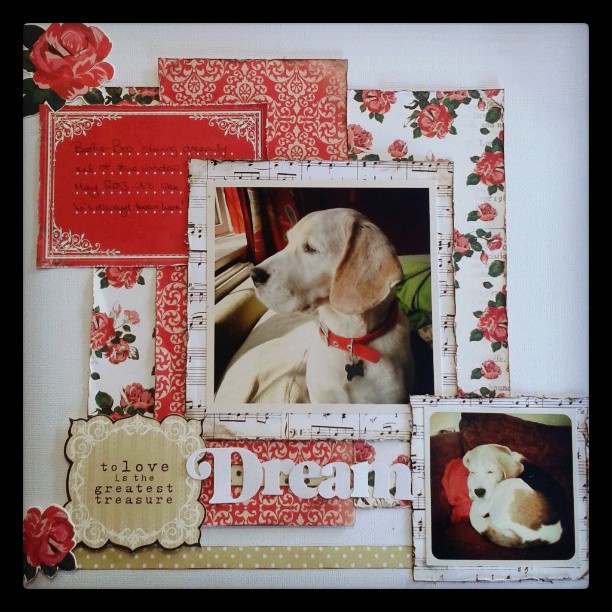
These layouts were created with the Porcelain Rose collection by Kaisercraft- all designed by Chrissy.
Yup that's 'DH' with his Father's Day pressie and chocolate moustache and below is our Old Beagle Bertie looking very wistfully out of the window!

Happy Crafting!
GlitteryKatie xxx

26 June 2013

June Blog Hop-Layers


This Month's theme is textures and Layers and I LOVE textures and layers!
I had this cute but very plain paper mache heart which was just begging to be covered...so I did!
I used a mixture of Teresa Collins and Prima papers which I REALLY roughed up the edges of with my Tim Holtz paper distresser and lightly inked them with Distress Ink, Walnut Ink. The edges of the papers were glittered!

I used Bombshell Angel coloured with Spectrum Noir pens, I mounted her on a Floral Oval by Spellbinders and attached her to the covered heart. Finally I added a spellbinders banner with 'Bombshell' stamped on it and added some paper roses.


Supplies
Paper Mache Heart
Teresa Collins 6x6 papers
Prima 6x6 papers
Diamond Dust Glitter
Distress Ink
Spellbinders Banners & Floral Ovals
Spectrum Noir Pens

Now hop along to see what Suzi has created HERE

Here's the whole Blog List so you can see what the whole DT have created!

Bombshell Blog
Alison
Kim
Jodi
Stempelientje
Marnie
Alaine
Glittery Katie YOU ARE HERE!!!
Suzi
Kapree
Jenn
Sharon
Kelli
Kathi


Happy Crafting!
GlitteryKatie XX

13 June 2013

Name Your Poison!

Hello Bombshell Fans! Alison here. I am happy to share with you June's Wacky Holiday. This month, it's "Name Your Poison." Here's some info about this unusual holiday as per Holiday Insights.

Name Your Poison Day is a day to make a choice. The term "Name Your Poison" is commonly used to suggest that you select among a number of options.This term has a negative connotation. The origin of this term is unknown. But, at the time, it probably referred to some unhappy choice. It is commonly used when asking someone what type of alcoholic drink they want. But, it is also used to refer to any choice of options, good or bad. For example, "Name Your Poison" may refer to selecting an ice cream flavor, a dessert choice, etc. Celebrate today by making a decision..... Name Your Poison.

See the rest of the DT's fabulous projects on the Bombshell Blog!


It was my birthday this week and I do love a Gin & Tonic and one of my presents was my own bottle of Tanqueray Gin!! So of course I had to name a G&T as my 'poison'!!
I used the fabulous Man's Ruin and coloured her with Distress inks in a water colour style and added lots of Stickles for some 'fizz!'
I hope you're inspired to create something that shows you poison of choice!!

Happy Crafting!
GlitteryKatie xxxx

4 June 2013

Skull Appreciation Day!

Now we here at Bombshell Stamps LURVE our skull stamps and we 're not the only ones who celebrate our skulls which is why Bombshell Stamps is joining in with a super cool Blog Hop organised by Smeared and Smudged Stamps:

Do you love creating amazing projects that showcase skully goodness? Wanna get some traffic to your blog and share your obsession? Join us on June 4th for one wild blog hop event! We will be celebrating Skull Appreciation Day 2013 by featuring handmade projects that spotlight the much-loved cranium. 


Here is my project using Sugar Skulls and the Mini Top Hat pattern from Fleece Fun


Thanks to my gorgeous Daughter for doing an excellent modeling job!


I created a mini top hat using black felt, cardstock for strengthening and sparkly braid along with ....


...a stamped Sugar Skull onto cardstock, coloured it in using Spectum Noir pens IG1, IG2, IG3, IG4, IG5 which I glued onto a double layer of black felt, trimmed and stitched around the edges, before attaching to the front of the hat.

Now hop along to the Bombshell Blog to see what the designers have come up and follow the links to all the other DT blogs!

Happy Crafting!
GlitteryKatie X

2 June 2013

Ms June's Challenge


Sharon Rogers, Bombshell's Ms. June, has issued a "Be Clear" challenge! She challenges us to use acetate or vellum with your Bombshell stamps to create a fabulous project!
Here's what I created:


I used Loutus Garden which I stamped onto acetate with Staz-On ink. I used Stickles glitter glues to colour in the koi on the back of the acetate to create a shimmery semi-transparent look.

I hope you like my card now pop over to the Bombshell Blog to see the lovely projects created by the rest of our wonderful Design Team!

Happy Crafting!
GlitteryKatie XxxxxX

29 May 2013

MAY DAY...Bombshell Blog Hop!!

Here in England May has been rather cold and wet but we remain ever hopeful- it's in our nature as our weather is so changeable LOL!!
However one thing that never changes is our monthly Bombshell Hump Day Blog Hop!
YAY!

Alison has chose a cute theme for this month's hop:

"The theme is "Banners" This month, May: Banners- Use the pre-fabbed banners that come with many of the Bombshell Stamp Sets, or create some of your own banners to embellish your creations. You can even make a banner as your project!"

Last month I created a holiday themed Bombshell project with Cherry Bomb and some banners:


My project for today is slightly delayed as I have a horrible chest cold and am coughing like crazy- doesn't make for great colouring in!!

Now hop along to the Bombshell Blog to see what the other DT members have created- I can't wait to see what they've made!

Happy Crafting!!
A slightly grotty GlitteryKatie!
xxx

27 May 2013

Tin Type Sailor Girl!

Today is Muse Monday over on the Bombshell Blog where we showcase one Bombshell stamp set every Monday for a month.
This month it's the turn of Ahoy Sailor!

I had a little Altoid tin that was just asking to be altered so I DID!!

 First I covered the tin with some cool vintage paper from Bazzill Basics (Antique Papers)


I filled the tin with stamped images from various sea and sailor themed Bombshell Stamps.


 Pride of place went to the Beautiful Ahoy Sailor Girl herself mounted on a Spellbinders frame!


I coloured her in using my Spectrum Noir pens and cut her out and mounted her on the Spellbinders Floral Oval to go on top of the covered tin.

Pop over to the Bombshell Blog to see what Alison and Stempelientje have also created!

Happy Crafting!
GlitteryKatie xxx

26 May 2013

Don't forget your suncream!

We love our Wacky Holidays here at Bombshell Stamps-it's a mine of inspiration!
May 27th is Sunscreen Protection Day just in ahead of the summer and holiday season. It educates and brings awareness to the importance of using sunscreens to protect yourself and your children from harmful UV rays from the sun. So remember to slap to on the suncream!

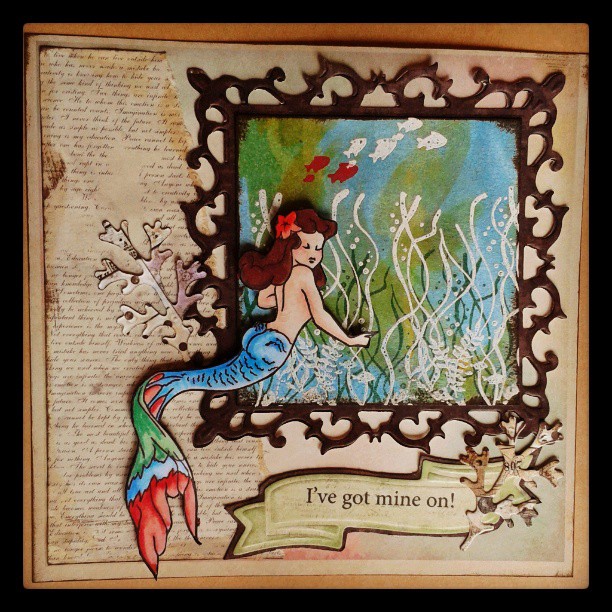
I used the very cute Mermaid Treasure because even Mermaids need suncream!


I created the under sea back ground by stamping the seaweed stamp  and fish from the Mermaid Treasure stamp set and embossing it with white embossing powder. 
I then swept Blue and Green Distress Stains across the embossed seaweed.
When dry I over stamped the seaweed in dark green and some extra fish in orange.
I cute the background into a square to fit into the Spellbinders fleur de lis frame.


I coloured the Mermaid in using Spectrum Noir Markers.


Body: FS1, FS3, FS5, FS7, FS9
Tail: IB1, IB2, IB3, TB3
LG3, LG4, LG5
CR1, CR4, CR10, CR11
Hair: EB3, EB4, EB8

Now pop over to the Bombshell Blog to see how the Bombshell Design Team have been inspired by Suncream Protection Day!

Happy Crafting!
GlitteryKatie xxXxx

19 May 2013

Metal Work!

I love working with metal and stamps!

Here is my take on Ms. May's cool challenge which was to use: the colors - Grey & Jade, Gold, Silver, White and the textures - Dry Embossing, Scrolls, Scallops, Satin Ribbons, Metallic, Glitter.


I managed to use: metal, dry embossing, satin ribbons,scrolls, silver, jade and white!


First I covered my tag in foil tape and embossed around the edges and pressed a pencil into to to form rivet holes so it looked like metal plates fixed together.

I painted jade paint all over it, left it for a couple of minutes then wiped it over to remove a lot of the paint.
When the jade paint was dry I added a spritz of white paint to calm the jade down.


For the motorbike I stamped Live to Ride onto a square piece of foil with Staz-on ink then I used an embossing tool to go around the stamped image.

When I had embossed around the image I ran a textured wheel tool around the edges of the foil to give it a machined look.
To give an oiled look I wiped Staz-on around the edges of the foil square and the jade tag!
I added a couple of Tim Holtz Idea-Ology gears and tags to the tag and coloured some satin ribbon with Jade and silver paint and I was done!
Thanks to Marnie for a great challenge!

Happy Crafting!

GlitteryKatie xxXXXxx

14 May 2013

Scrapbooking Update!

I haven't put any of my scrapbook layouts up for ages.
I have a monthly crop with my pals where I do most of my bookscrapping, great therapy to chat and scrap with my pals!

So I've been playing with my Crafters Workshop Templates, Glimmer Mist Sprays and texture paste:


 Above is a layout of my Big Sister when she was a diddy thing using Washi tape and stencils with texture paste in the corners.


...here is my Little Miss Acorn turning TWELVE!! Where does the time go?!

I've been using the fabulous Kaisercraft Collection die cuts which make for a super quick Layout- i love them!


  This is 'The Blonde One' back in 2009 when we'd just brought our 2nd Beagle baby home- look how young they both look! It was a very quick layout which I pre prepared the back ground and found photos and the Kaisercraft die cuts to pull it all together!


...this is a quicky layout with scraps of patterned papers, washi tape and stamps and lots of teeny pictures wth the Kaisercraft Collectio Diecuts showing the madness of Beagle NO.1 Miss Willow!

I am a longtime user of diecuts, QuicKutz alphas and Sizzix Alterations still get lots of use by me:


 Bertie our Golden Oldie BEagle who's recently joined our family and Little Miss Acorn cuddling!
I used my QK alphas here along with my typewriter for the lables...this is my attempt at clean and simple WELL out of my comfort zone LOL!


..this is 'DH' and I on our new bikes- reworked layout with a HeroArts alphabet die!


...here's that Heroarts typewriter style alpha die again. I bought an old portable typewriter a few months ago on Ebay and I've been using that a LOT for my journalling!
It's great I stick a piece of patterned paper or a tag in the typewriter and off I go- love that vintage look!
This ia 'The Blonde One' working on his recent Art GCSE project!

I do take a lot of photos when we're out and about as a family and even manage to catch my Middle child' The Boy with teh Hair' in a few of them -he's going through tat 'don't photograph me' stage- like I listen LOL!

So with several photos I like to print them out generally less than 4" in size and mix the size of the photos on a layout!


...I usially find the smaller size gives me room to add the number of photos I want to, to a layout and a journalling block or two.
Varying the sizes stops the layout looking too uniform- I prefer things to be a little lopsided and uneven!

Lastly I've been using lots of 6x6" paper pads and I am LOVING them! I adore using multiple patterned papers and with 6x6" papers I can get LOTS more on a page!


This is Little Miss Acorn recently looking like a cheeky Little Imp in the garden showing off her new clothes and her cool geeky specs!
I went for pretty papers with a grungy edge for my girlie!

Happy Crafting!
GlitteryKatie xXXXx

24 April 2013

April Bombshell Blog Hop!!!

Finally we've had some decent weather here in England HOORAY! I hope you are enjoying some wonderful weather too- there's nothing like some sunshine to lift the spirits!
Alison has chosen a beautiful colour combo for the Blog Hop this month- it's so perfect for the season, I love these colours!

"This month, we have a color challenge. I'd like like for you to use at least 3 of the colors shown (though more is always better!) and your Bombshell stamps to create a project. Don't worry about being exact...just try to get the colors as close as you can to the palette below."


So with the good weather in mind I went for a 50's holiday themed project "Wish you were here!"


Supplies:
Patterned Papers by Kaisercraft, Glitz esigns, October Afternoon, Bo Bunny
Washi Tape
Spectrum Noir Pens
Polaroid Frame Kaisercraft

Now Hop along to the other Blogs and leave some love for a chance to win a Bombshell Stamp set of your choice- or better still play along with us on the Bombshell Blog!

Glittery Katie YOU ARE HERE!!
Kathi

Happy Crafting everyone!
GlitteryKatie xxx

22 April 2013

It's Muse Monday!!

Amazing that it's the 4th Monday of April already which means it's my turn for Bombshell Blog's Muse Monday!
Each month we choose a Bombshell Stamp Set to showcase and then each Monday the Design Team members show you their projects!
I love seeing the variety of projects and looks from the same stamp set- very inspiring!

This month it was Harley Bikes which is a new stamp set for me.
I wanted to do something a little different and took inspiration from a scrapbook page.
I imaginged the effect a Harley would have on a little old lady, the imaginary Great Aunt Ada who was secretly a biker!


Supplies
Harley Bike Bombshell Set
7 Gypsies Trousseau papers
7 Gypsies Tea-Thyme Journalling notecard
Tim Holtz gears
Distress Ink

See the other Muse Monday posts over on the Bombshell Blog!

Happy Crafting!
GlitteryKatie xxXxxXxx

18 April 2013

A Little Card!


I loved the simplicity of Kathi's sketch this month and created this quick card:


Supplies:
Lotus Garden Bombshell Stamps
Banner Saying Bombshell Stamps
Spellbinders Fleur de Lis Squares
Crafters Workshop Template
Patterned Paper
Spectrum Noir Pens
Crackle Glaze
Mister Huey Paint

Happy Crafting,
GlitteryKatie xxXXXxx

5 April 2013

Inky, Pastey Stencil Tutorial


I love getting inky and when Alison challenged us to use our stencils I knew it was the perfect chance just to 'PLAY!'

First of all I cut a piece of 6x6" card to be my base.
Next I took some pieces of patterned paper and glued them randomly onto my 6x6" base:


I trimmed the edges of the patterned paper and lightly brushed some turquoise paint and cream paint onto the base loosely around the edges...


...and I squirted a bit of pink Glimmer Mist into the centre (it was time for some glitter!)

It was stencil time!
I took some of my Crafter's Workshop Stencils out and squidged some Modelling Paste (in any good art shop!) through them onto my painted base:


I love this effect as it adds texture which is easy to hghlight with Distress Ink pads or paints.

Here I brushed Distress Ink pads over the dried Modelling Paste:


The colour was brighter than I wanted so I applied some white paint to tone the colours down:


I was happy with my 'canvas' so next I started work on the stamped images I wanted to add.
I stamped my Bombshell stamps onto some Kraft paper and some Lined paper:


I used my Spectrum Noir pens to colour in the Roses to compliment the the colours I'd used on the base canvas.

I used my Matte Medium to stick the Stamped Images:


I finished off the canvas by adding some chipboard letters and a paper rose:


Ta-da and that's how I built up my inky, stencilled canvas!
I hope you enjoyed my tutorial!

Supplies:
Dead Necessities Stamp Set
Cherry Bomb Stamp Set
Homeward Bound Stamp Set
Classic Tattoo Stamp Set
Scraps of patterned paper
Crafter's Workshop Stencils
Galleria Modelling Paste
Acrylic Paints
Matte Medium for glueing
Distress Inks
Chipboard Letters and shapes

Happy crafting!
GlitteryKatie xxxXXxxx