Showing posts with label Altered. Show all posts

29 June 2010

It's the BOMBSHELL June Blog HOP!!!!!!

BOY TOY:


I used:
Basic Grey Basics Craft
Tim Holtz Texture Fades (Patchwork)
Distress Ink
7 Gypsies Gaffer Tape
Bombshell Live to Ride Stamps
Copics

First chance to win is with Kas's Boy Toy Challenge

Time for being hot...it's summer!
So what's the deal with a "Boy Toy" bloghop.
Well, it's dedicated to the men in our lives.
Doesn't have to be a boyfriend or husband..... maybe a soldier, a father, or just a masculine theme or card.

Bombshell stamps have always been great for "manly" things, but now more than ever.
Just think about the new digi clothes stamps for the Bombshell Angel. The policeman, fireman, etc... they are GREAT for sending out that perfect card.
AND MAN...the new motorcycle stamps !!!
Perhaps your project will just use masculine colors


Memories of Rose


I used:
Cosmo Cricket paper
Bombshell Rose's Portrait Stamps
Grungepaper and Distress Inks for the 3d roses
Sizzix Tattered Floral dies (for the roses)
Tim Holtz idea-ology frame

The SECOND way to win is with Miss June's (Cajunstampingqueen) special challenge the Memory Lane Challenge.

Hello My Lovlies! I am the Guest Designer and challenge hostess for the month of June! I've got a special challenge lined up for this month and I hope everyone decides to play along. I have decided to alter a box this month, a Memory Box.

We all at some point in time have received little notes from the kids or hubby or favorite neice/nephew that we couldn't bear to part with. Or that little drawing that came home from school, the first art project that you still don't really know what it is but you love it all the same...that special something from someone important to you. I have so many of those things from my kids that I want to display and i am running out of room to do so, sooooooo I decided to make a box for them. Well several boxes actually. This is the one I started with....my children love Bombshell stamps, they are 15 and 11....anyway they each got to choose which set represented them the most(in their opinions) and I went from there. I have added paint, decorative paper, pictures, I even used the first quitar string we had to replace on my daughters guitar and the beads my son painted for me from his favorite book series last month!!!


And thirdly don't forget Kathi's June Sketch challenge.

As you can see I've 'double dipped by using Kathi's sketch for my BOY TOY card!!


So now it's time to HOP!!!!!


Kas
Meredith
Kathi
MaryG
Steph
Cheryl
Kelli
Angie
Sy
Alison
Danielle


Love,
GlitteryKatie XxX

22 June 2010

Shrine Time!

I've loved looking at shrines that other people have created and wanted to 'have a go' but didn't really have a clue where to start! So to give me a kick start I decided to sign up for a small swap on a forum! Talk about throwing myself in at the deep end- I hadn't a clue!!

So I pootled off to one of my fave blogs by Effie to have a peruse of her shrines and get some ideas!

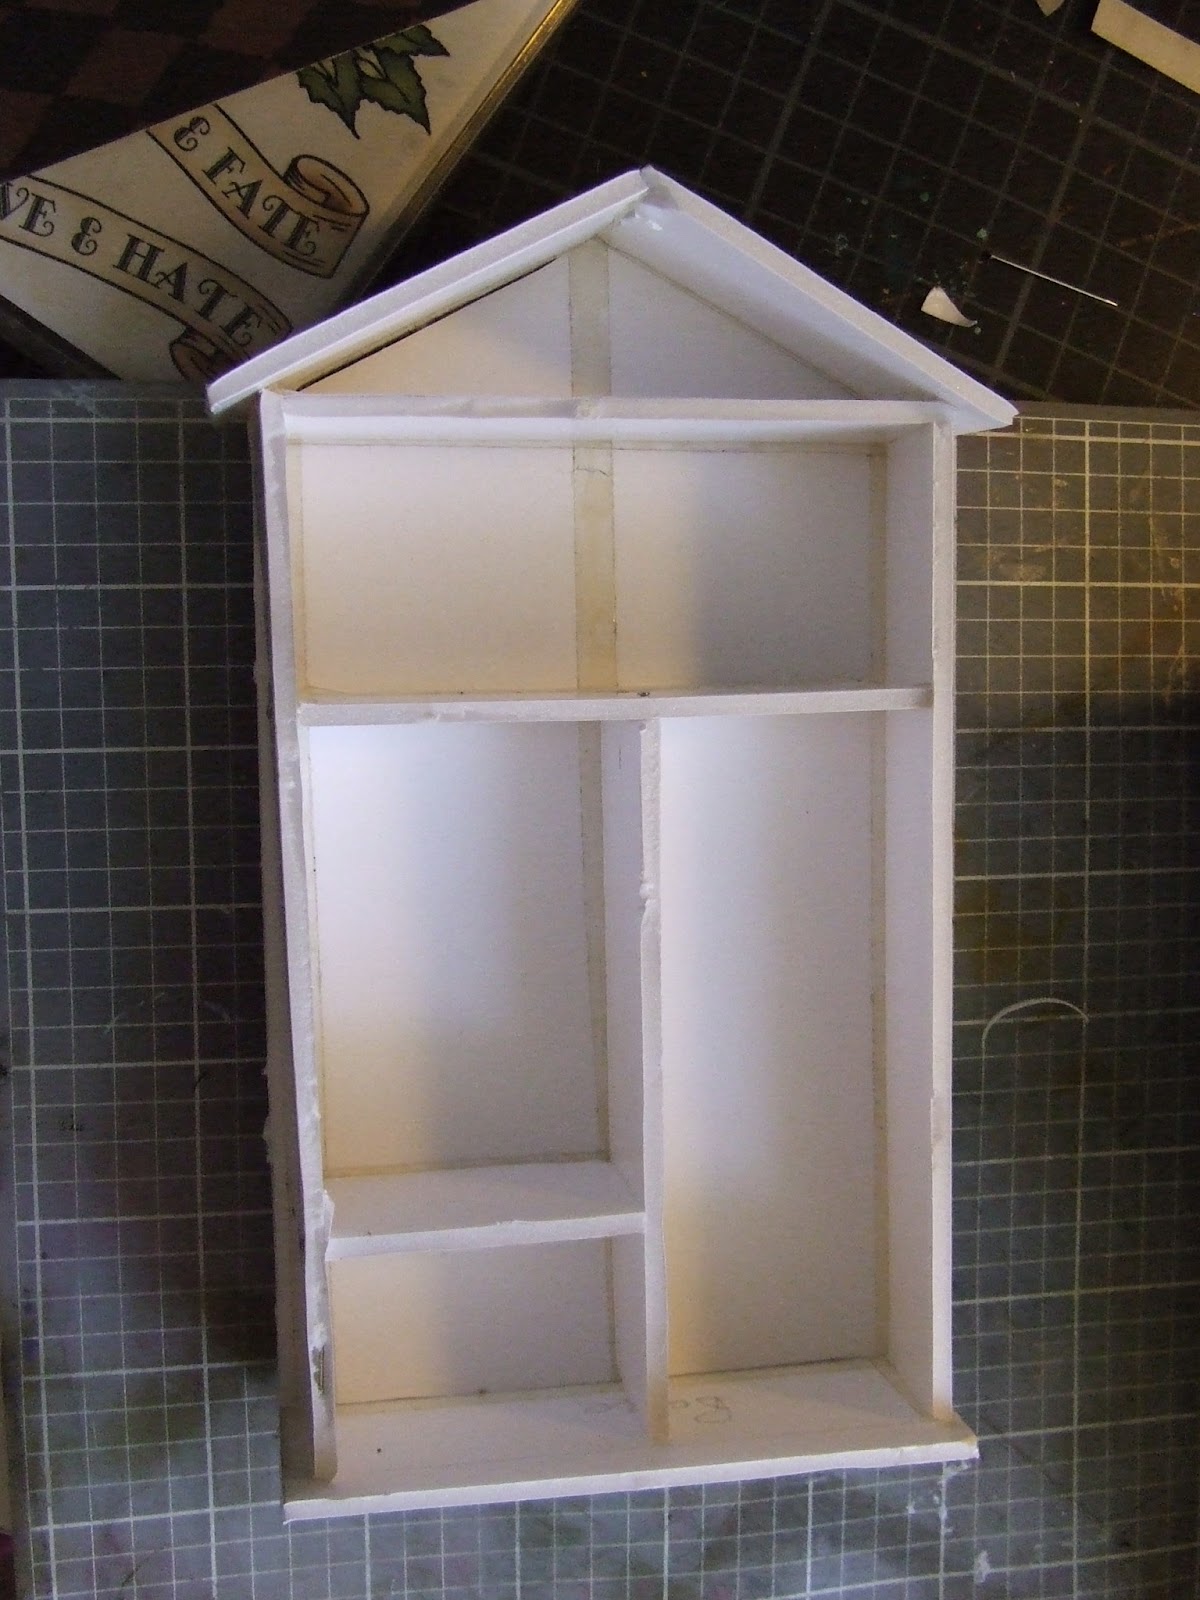
So where to start? Efemera had recommended using foam core board to create a box for the shrine so I went off to our local art shop and bought a HUGE A1 piece for about two quid! The foam core board is light and strong and is about 1/4" thick so it makes a great box!

I used double sided tape to attach the sections of foam core board together:


...adding shelves as I needed:


I then covered the whole shrine with torn pieces of Dictionary pages (DO be careful to check for rude words!!). I used a spray on glue to stick the paper on- as it was dry straight away, no waiting around for glue!


I then used Distress Inks to colour the shrine. I squidged a foam pad onto the ink pad then rubbed the colour onto different parts of the shrine.

When the ink was dry I stamped a swirly stamp onto the shrine and added gold embossing powder which I heated carefully with my heat gun.


Next it was time to create the 'story' for my shrine.

This is a window into my VERY strange brain- but I based my shrine on a dream I had...about moths and buses and West Drayton, don't ask *chortles*

So I found or made items that would tell my story and assembled them on the shelves. I wanted it to look like the jumbled, over stuffed shelves of a Victorian museum (like the Pitt-Rivers Museum in Oxford!) full of a weird, eclectic mix of items!


Here are some close-ups of the shelves and the bits and pieces!


So there's my first shrine! I was pleased with it and surprised how easy it was to make! Making it was much easier than the worrying about making it that I did before hand!

I found the process of filling the little shelves really fun and it certainly got the mojo flowing- in fact I have another shrine in the planning stage already! I think I'm gonna have a lot of fun with shrines!

*Waggles inky fingers*

GlitteryKatie

XxxxXxxxX

28 January 2010

Triptich

I made this using the shrine template from Bombshell Stamps and their Wooden Madonna stamps:


I used Webster's Pages papers
Copic Pens:
G21, G94, G85, YG63
B32, B95, B24
Wi, W3
E00, E21 and Y00
Y11, Y21, Y38, YR16
and Glitter (of course!)
I used Tim Holtz thingies for the handles!

27 January 2010

Here are some MORE Bombshells!!!

This is a Mexican alter that I bought from 3dJean ages ago.
I knew I wanted to use my Sugar Skull and Alter Skull Bombshell sets with it!

~First of all I used watered down PVA glue to stick strips of old book text to it:


~I then painted the shrine with Tim Holtz Distress Inks (I used an aquabrush to pick up the colour from the inkpad).
~I stamped the Sugar Skull, Words and the candle stamps with Staz-On onto some white Fimo.
~I cooked the Fimo as directed on the packet then used Lumiere paints on the Sugar Skull (for some glitter!) and colours from my Distress Inkpads on the Candle and Sign.

~I stamped the rose from Love & Luck onto red foil using Staz-On twice.
I cut out the WHOLE rose AND I cut the centre out of the other and mounted this onto top of the whole rose using silicon glue (for depth)
I stamped the leaves out on Green foil and cut them out and then mounted the rose and leaves onto the shrine.


I added a couple of little paper roses and the shrine was done!
Hope you enjoy!!

26 January 2010

January's Bombshell Blog Hop!!!

It's time for the Bombshells to GET HOPPING again!!!

ALTERNATIVE MEDICINE

We all have our own home remedies...a pinch of this, with a dash of that and gargle. *giggle Well, it's time to put your thinkin' caps on, and ALTER an item you have laying around. That's right...don't be content with that over the counter crafting stuff...take something you have and give it a little bit of TLC; a pinch of this glitter and a splash of that alcohol ink. (Hopefully you won't have to gargle....*wink) Let your imaginations run wild as you use your Bombshells to breathe new life into an otherwise boring item.

Now Here's a 7Gypsies bottle I have owned FOREVER (LOVE 7g's goodies!) so rather than it gathering dust on my shelf I dug it out and BOMBSHELLED it!!!


I used Sugar Skull Bombshells and my Copics: E31, E33, E35, E15 and Walnut Distress Ink


LOOK at he goodies you could win!!!
YUM YUM!!!!


So remember to be in the draw for a chance to win these goodies leave comments on the Bombshell girls blogs (the more comments the more entries you get!)

OR you could play along with our January Sketch Competition. See Details HERE!


Now go HOP!!!!!

Lyss

Sy

Kathi

Keely

InkyButton

Kas

Gabby

PinkStar

Kelli

MaryG

Miss Magoo

Lina

30 December 2009

Hump Day Hotties Bombshells Blog Hop!!!

Well after Christmas and I had a great time but haven't a CLUE what day it is!!!
This is a project I made in the autumn- I wanted to create something that looked like Pyrography- the image burnt into the wood!


I used an off cut of wood from DH's bathroom DIY and stamped the image with brown Staz-on!
I neatened the back of the piece of wood up by covering it with a page from an old book and I finished the edges with some copper tape which I stuck on then rolled flat!
Tim Holtz ideology bits and piece went well with the metal and wood look so ON THEY WENT!!
So there you have it one LOVE TILE in wood!!

So now I'm off too to see what the other Bombshell's have created, so come hop with me!!!


Mary G.

Ms. December - Erika

Kathi

Nicole

Kas

Gabby

Miss Magoo


And don't forget to leave a comment on the Hottie's Blogs so you could be in with a chance to win gorgeous GOODIES!!!!

23 December 2009

Festive Stuff in a box!!

Made a few pressies for my lovely family.
The base was 79p paper mache boxes from HobbyCraft which are about 2"x3"
Christmas Digital set from *iTkUpiLLi*
Stickles of various hues from Scrapshed

Voodoo Doll was given to my eldest niece as a jokey stress reliever!


This was for my other niece who missed the snow, living in Bristol!


This was Christmas in a Box for my Sister!!


Just wanted to wish you all a very Merry and Crafty Christmas!!

Love Katie xXx

8 December 2009

Tim's Tags!


I've been playing along with Tim's Tags this year but using my fave stamps!

1 December 2009

12 Tags must be DECEMBER!!!


Hooray Tim Holtz is sharing his talents with us again!!!
Here's the First of his 12 Tags of Christmas!!

29 November 2009

Played at colourin' in yesterday!!


Had a lovely , lovely day yesterday in Flit(w)ick!!!
Made my Chrissy ATC's withe the cool digi sheets from ITKUPILLI's shop.
Made a crad for a lil' pal who was SEVEN yesterday from my Bronte and Bella piccie (love these 2 so much!!)AND did some colouring in of a new Mo Manning illustration 'Out There' in aid of Meningitis Search 4 a Vaccine Campaign.
Colouring in a is SO relaxing!!
So thanks to Mel, Glad, my mate archie and all the girls- I had a brilliant and RELAXING time!!

18 November 2009

Hump Day Blog Hop No. 11

Remember there's another Bombshell goodie bag up for grabs with Novembers Challenge!
November's Monthly Grab Bag Prize!!!
You have 2 ways to win play along and enter a son/music inspired Bombshell project AND Start at any of the Design Team Member Blogs and take a peek at their Hump Day project. Leave them a comment and tell them what you think about it! Then follow the links to the other DT member blogs and leave them comments. The more comments you make, the more entries you will have to win a great prize from Bombshell Stamps at the end of the month!
- HOW COOL IS THAT??!!


This week the Bombshell girls challenge is

Who's Got The Button?

They hold up our pants, keep our shirts closed, and yes, they even add a little extra something to our cards. This week's challenge is to use buttons: shell buttons, faux buttons, sparkly buttons, panic buttons...any type of button you please. The more buttons the merrier in fact, just make sure you use a button


I love those button embellishments by Jenni Bowlin and really wanted to have a go at making my own Bombshell version!


I used 2 quickutz button dies one large and 2 small:


I cut buttons from light chipboard and from Making Memories Ledger paper and stuck the ledger paper over the chipboard to make the buttons.

I then stamped my Bombshells onto my buttons.

For a vintage look I coloured the stamped images with Sepia shades of Copic pens: E00,E31,E33,E35

...and then you have your own Bombshell button embellishments! I'm going to use mine for layouts and cards and make the larger button into a lapel badge!

Now hop off to the next blog and happy crafting!


Angela

Kathi

Ms. November - Mary G.

Miss Magoo

Glittery Katie

Kas


Love GlitteryKatie! xXx

13 October 2009

Bombshell Stamps Hump Day Hop

Welcome to the Bombshell Hump Day Hop! The Bombshell Design Team Members are bringing you a fabulous hop each and every Wednesday! View rockin' projects at each stop along the way and leave comments to win a fab prize.

This week our theme was created by Jacquie, Ms.October, and is a "Color Challenge" - since it is the month of Halloween...(and I LOVE halloween), the color challenge will be to use Orange, Black, Green and Purple (Optional).


Here's how it works:
Start at any of the Design Team Member Blogs and take a peek at their Hump Day project. Leave them a comment and tell them what you think about it! Then follow the links to the other DT member blogs and leave them comments. The more comments you make, the more entries you will have to win a great prize from Bombshell Stamps at the end of the month!


I'm so excited to see what everyone comes up with!! -you never what's gonna be around the next blog corner! So stop by, add your comment, and then hop on over to the other Bombshell DT Member blogs, and don't forget to join us again next week!!!


Angela

Kas

Miss Magoo

Jacquie (Ms.October!)

Gabby

Sarah K

Lyss

Kathi

Terra

Nicole


So this week The Bommbshell Girls are sharing with your the mistakes and horrors that we ALL have lurking at the back of our craft cupboards:

What was I thinking?

We've all done it; made one of those purchases that just seem perfect in the middle of a store with a coupon in hand. Then, when you get home, you look at it and say, "What was I thinking?" So that's our challenge for this week. We've pulled that purchase out of your stash and got crafty with it BOMBSHELL STYLEE!!


So I FINALLY dug out the shrink plastic! This was an impulse purchase from a close out sale at a local craft shop. Whilst the plastic shrinks perfectly without to much unnerving curling and crazy whipping about- it seems however to be allergic to any colouring medium!! No matter what medium I use and no matter the technique I use to apply this shrink plastic repels it!!!
So when faffing around with the plastic I stamped on it with black Staz-On and didn't bother to colouring it, then I shrank it. I really liked the effect- my 'DH' said it looked a little like Scrimshaw (so he got a big kiss for being so nice!!).

The earrings were made using a Skull die from QuicKutz which I stampedwith the flowers from the Hula Girl Bombshell Stamp set.
The keyring was also made from shrink plastic cut with the QuicKutz Revolution and stamped with stamps from Retro Cowgirls and A Pirate's Life Bombshell sets.
I threaded the shrinkies onto Tim Holtz Swivel Clasps and attatched various other Tim Holtz charms (I love their grungey look!)
Remember to punch a hole in the Shrinkies BEFORE you shrink them so you can thread a jump ring through. Make this hole larger than normal to allow for shrinkage!