29 May 2013

MAY DAY...Bombshell Blog Hop!!

Here in England May has been rather cold and wet but we remain ever hopeful- it's in our nature as our weather is so changeable LOL!!
However one thing that never changes is our monthly Bombshell Hump Day Blog Hop!
YAY!

Alison has chose a cute theme for this month's hop:

"The theme is "Banners" This month, May: Banners- Use the pre-fabbed banners that come with many of the Bombshell Stamp Sets, or create some of your own banners to embellish your creations. You can even make a banner as your project!"

Last month I created a holiday themed Bombshell project with Cherry Bomb and some banners:


My project for today is slightly delayed as I have a horrible chest cold and am coughing like crazy- doesn't make for great colouring in!!

Now hop along to the Bombshell Blog to see what the other DT members have created- I can't wait to see what they've made!

Happy Crafting!!
A slightly grotty GlitteryKatie!
xxx

27 May 2013

Tin Type Sailor Girl!

Today is Muse Monday over on the Bombshell Blog where we showcase one Bombshell stamp set every Monday for a month.
This month it's the turn of Ahoy Sailor!

I had a little Altoid tin that was just asking to be altered so I DID!!

 First I covered the tin with some cool vintage paper from Bazzill Basics (Antique Papers)


I filled the tin with stamped images from various sea and sailor themed Bombshell Stamps.


 Pride of place went to the Beautiful Ahoy Sailor Girl herself mounted on a Spellbinders frame!


I coloured her in using my Spectrum Noir pens and cut her out and mounted her on the Spellbinders Floral Oval to go on top of the covered tin.

Pop over to the Bombshell Blog to see what Alison and Stempelientje have also created!

Happy Crafting!
GlitteryKatie xxx

26 May 2013

Don't forget your suncream!

We love our Wacky Holidays here at Bombshell Stamps-it's a mine of inspiration!
May 27th is Sunscreen Protection Day just in ahead of the summer and holiday season. It educates and brings awareness to the importance of using sunscreens to protect yourself and your children from harmful UV rays from the sun. So remember to slap to on the suncream!

I used the very cute Mermaid Treasure because even Mermaids need suncream!


I created the under sea back ground by stamping the seaweed stamp  and fish from the Mermaid Treasure stamp set and embossing it with white embossing powder. 
I then swept Blue and Green Distress Stains across the embossed seaweed.
When dry I over stamped the seaweed in dark green and some extra fish in orange.
I cute the background into a square to fit into the Spellbinders fleur de lis frame.


I coloured the Mermaid in using Spectrum Noir Markers.


Body: FS1, FS3, FS5, FS7, FS9
Tail: IB1, IB2, IB3, TB3
LG3, LG4, LG5
CR1, CR4, CR10, CR11
Hair: EB3, EB4, EB8

Now pop over to the Bombshell Blog to see how the Bombshell Design Team have been inspired by Suncream Protection Day!

Happy Crafting!
GlitteryKatie xxXxx

19 May 2013

Metal Work!

I love working with metal and stamps!

Here is my take on Ms. May's cool challenge which was to use: the colors - Grey & Jade, Gold, Silver, White and the textures - Dry Embossing, Scrolls, Scallops, Satin Ribbons, Metallic, Glitter.


I managed to use: metal, dry embossing, satin ribbons,scrolls, silver, jade and white!


First I covered my tag in foil tape and embossed around the edges and pressed a pencil into to to form rivet holes so it looked like metal plates fixed together.

I painted jade paint all over it, left it for a couple of minutes then wiped it over to remove a lot of the paint.
When the jade paint was dry I added a spritz of white paint to calm the jade down.


For the motorbike I stamped Live to Ride onto a square piece of foil with Staz-on ink then I used an embossing tool to go around the stamped image.

When I had embossed around the image I ran a textured wheel tool around the edges of the foil to give it a machined look.
To give an oiled look I wiped Staz-on around the edges of the foil square and the jade tag!
I added a couple of Tim Holtz Idea-Ology gears and tags to the tag and coloured some satin ribbon with Jade and silver paint and I was done!
Thanks to Marnie for a great challenge!

Happy Crafting!

GlitteryKatie xxXXXxx

14 May 2013

Scrapbooking Update!

I haven't put any of my scrapbook layouts up for ages.
I have a monthly crop with my pals where I do most of my bookscrapping, great therapy to chat and scrap with my pals!

So I've been playing with my Crafters Workshop Templates, Glimmer Mist Sprays and texture paste:


 Above is a layout of my Big Sister when she was a diddy thing using Washi tape and stencils with texture paste in the corners.


...here is my Little Miss Acorn turning TWELVE!! Where does the time go?!

I've been using the fabulous Kaisercraft Collection die cuts which make for a super quick Layout- i love them!


  This is 'The Blonde One' back in 2009 when we'd just brought our 2nd Beagle baby home- look how young they both look! It was a very quick layout which I pre prepared the back ground and found photos and the Kaisercraft die cuts to pull it all together!


...this is a quicky layout with scraps of patterned papers, washi tape and stamps and lots of teeny pictures wth the Kaisercraft Collectio Diecuts showing the madness of Beagle NO.1 Miss Willow!

I am a longtime user of diecuts, QuicKutz alphas and Sizzix Alterations still get lots of use by me:


 Bertie our Golden Oldie BEagle who's recently joined our family and Little Miss Acorn cuddling!
I used my QK alphas here along with my typewriter for the lables...this is my attempt at clean and simple WELL out of my comfort zone LOL!


..this is 'DH' and I on our new bikes- reworked layout with a HeroArts alphabet die!


...here's that Heroarts typewriter style alpha die again. I bought an old portable typewriter a few months ago on Ebay and I've been using that a LOT for my journalling!
It's great I stick a piece of patterned paper or a tag in the typewriter and off I go- love that vintage look!
This ia 'The Blonde One' working on his recent Art GCSE project!

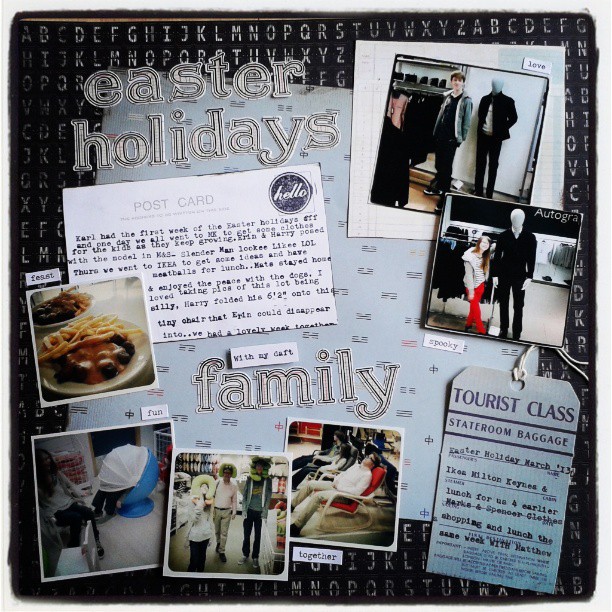
I do take a lot of photos when we're out and about as a family and even manage to catch my Middle child' The Boy with teh Hair' in a few of them -he's going through tat 'don't photograph me' stage- like I listen LOL!

So with several photos I like to print them out generally less than 4" in size and mix the size of the photos on a layout!


...I usially find the smaller size gives me room to add the number of photos I want to, to a layout and a journalling block or two.
Varying the sizes stops the layout looking too uniform- I prefer things to be a little lopsided and uneven!

Lastly I've been using lots of 6x6" paper pads and I am LOVING them! I adore using multiple patterned papers and with 6x6" papers I can get LOTS more on a page!


This is Little Miss Acorn recently looking like a cheeky Little Imp in the garden showing off her new clothes and her cool geeky specs!
I went for pretty papers with a grungy edge for my girlie!

Happy Crafting!
GlitteryKatie xXXXx